How to set up CactusVPN App for macOS
In this tutorial we will show you how to install and use the CactusVPN app v7 for macOS (for v6, follow this tutorial). Also you will learn how to connect to VPN and Smart DNS using our app, how to set up the app for the best performance and how to use the Apps Killer feature.
Table of contents
First let’s see what are our requirements:
Requirements
In order to use the CactusVPN app you will need:
- A CactusVPN account. If you don’t have one you can try our services for free.
- macOS Version 10.11 (El Capitan) or newer. If you have macOS 10.10 or lower, please follow one of our manual setup tutorials for VPN or the manual tutorial for Smart DNS.
- Your CactusVPN account email address and password to sign in to the app. If you forgot your password, you can reset it here.
Installation
-
Download the CactusVPN app from here and open the downloaded file.
-
Drag and drop the CactusVPN icon to the Applications folder to add the app to Applications.

-
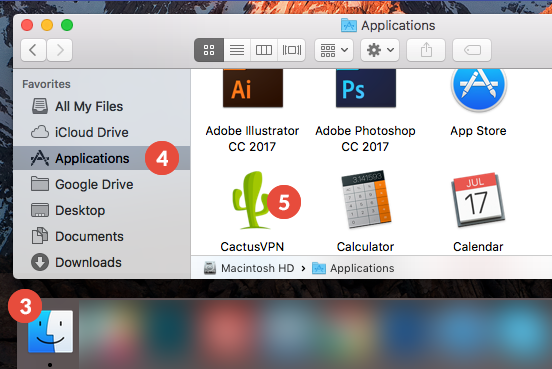
Open Finder (3), go to your Applications (4) and there you will find the CactusVPN app (5).
Sign in
-
Launch the CactusVPN app.
When you’ll open the CactusVPN app for the first time, you will be notified that the app was downloaded from the Internet and will be asked if you are sure you want to open it.
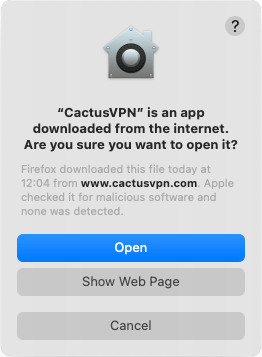
Click Open (6).
Also you may be notified that the CactusVPN app is trying to install a new helper tool.
Helper tool allows our app to create a VPN tunnel.
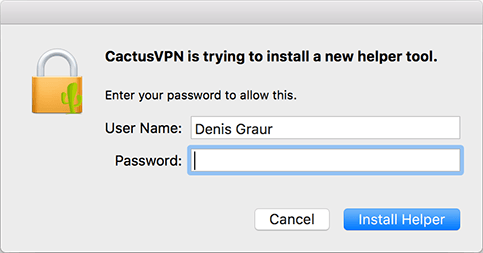
Enter your Mac user password and click on Install Helper.
-
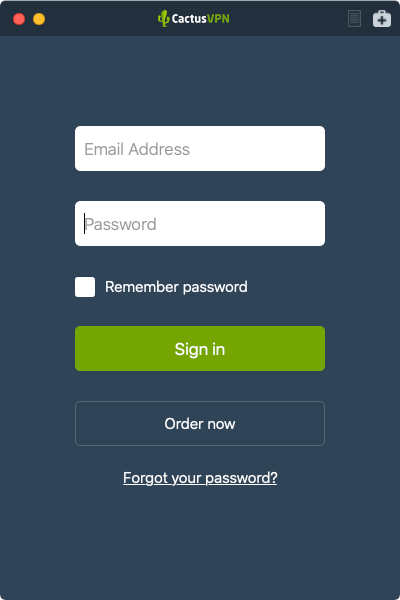
Type your CactusVPN account Email Address and Password.
If you forgot your password, you can reset it here.
Click Sign in.
-
If you have more than one active CactusVPN subscriptions, you will be asked to choose the subscription you want to use by default. Select the subscription and click on Continue.
This will happen only once. You can change the default subscription anytime from the app Settings.

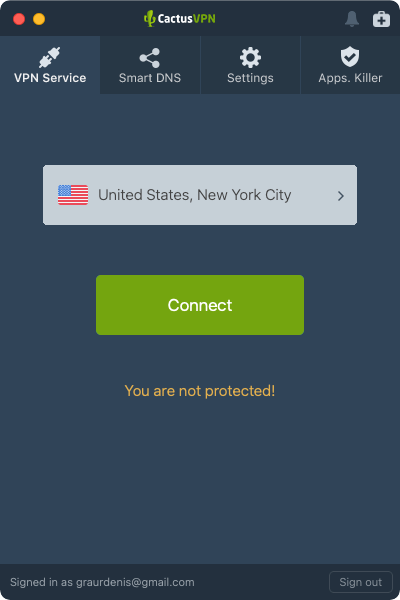
Connect to VPN
To connect to VPN, make sure the VPN Service tab is selected.
Select the VPN server location you want to connect to then click on Connect button.
If you are asked to allow adding VPN configurations, click on Allow.

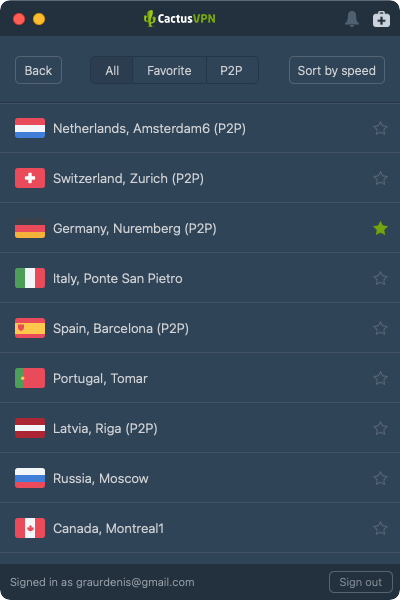
When choosing the VPN server you want to use, you can:
- Add your preferred VPN servers to favorites. Just click on the star icon at the right of the server.
- Filter servers by different criteria. Click on Favorites to see all your favorite servers or on P2P to see all the servers that allow P2P activity.
- Find the fastest servers for you. Click on Sort by speed and the servers will be sorted by the lowest ping to your computer.
Authentication Prompts while using IKEv2
If you managed to connect successfully to VPN and don’t see any prompts asking for authentication, you can skip this part.
When you are using the IKEv2 VPN protocol to connect to VPN, you may see different authentication prompts. We’ll show you below how to treat them.
Prompt 1: Neagent want to access key “com.cactusvpn.CactusVPN” in your keychain
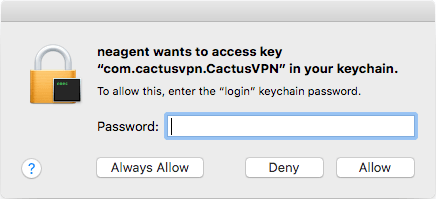
Solution: Enter your Mac user password and click on Always Allow.
It is requested by macOS (not by our app) as a additional security measure of the IKEv2 protocol.
If you click on Allow instead of Always Allow, the password will be saved only for the current session and will be requested again next time you’ll connect to VPN.
Keep in mind, the password will be requested every first time you’ll connect to VPN after restarting the app or signing out and signing in back. It is requested by macOS (not by our app) as a additional security measure of the IKEv2 protocol.
Prompt 2: VPN Connection
You may see this prompt if you are using a macOS version lower than 10.12.
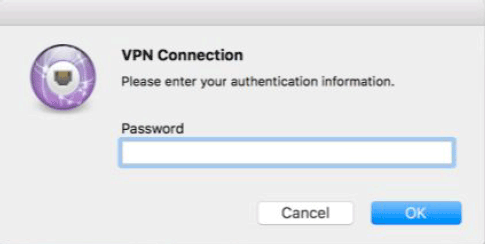
Solution 1: Enter your CactusVPN password.
Solution 2: Remove the CactusVPN app, reboot your Mac and reinstall the CactusVPN app.
Solution 3: Follow the steps below:
1. Open Keychain on your Mac and search for the CactusVPN:

2. Double click on the CactusVPN entry.
3. Tick the Show password checkbox.
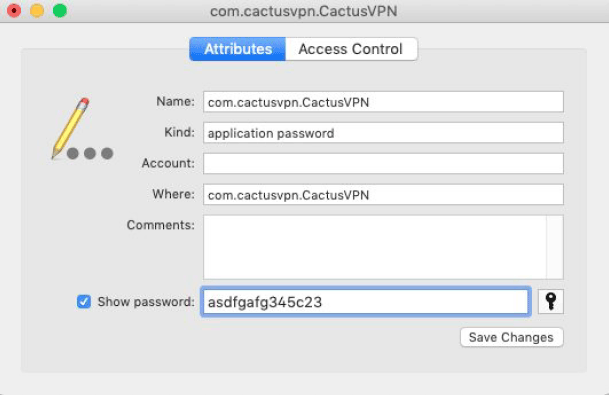
4. Copy the revealed password.
5. Go back to the CactusVPN app. Paste the password on the Password field from the VPN Connection prompt and click on OK.
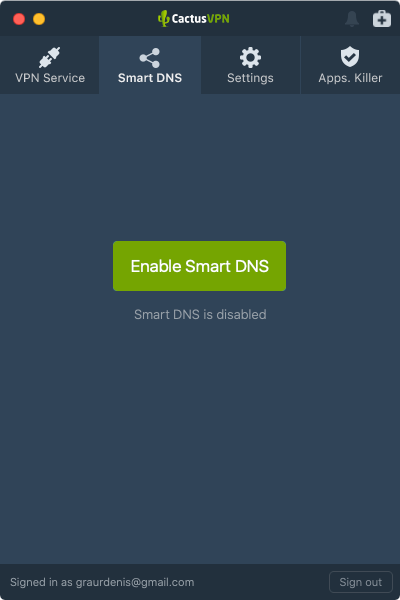
Connect to Smart DNS
To connect to Smart DNS, make sure the Smart DNS tab is selected.
Click the Enable Smart DNS button.
Settings
By going to the Settings tab you can make the following configurations:
CactusVPN Account
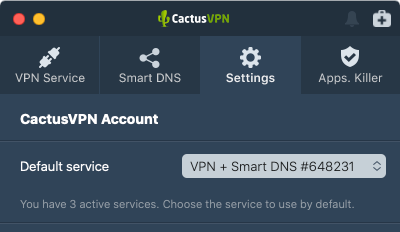
Default Service – You will see this option only if you have more than one active CactusVPN subscriptions. Here you can choose the service you want to use by default.
VPN
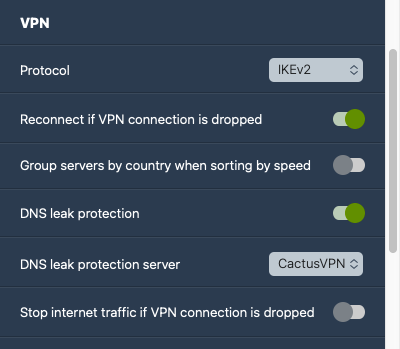
Protocol – choose the VPN protocol your want to use: IKEv2 or WireGuard. (What protocol should I use?)
Reconnect if VPN connection is dropped – automatically reconnect if connection is dropped.
Group servers by country when sorting by speed – when you sort VPN servers by speed, they will be grouped by country.
DNS leak protection – turn on or off the DNS leak protection (What is DNS leak protection?).
If DNS leak protection is turned on, you’ll be able to choose which DNS servers you want to use: CactusVPN, Cloudflare, OpenDNS or Google Public DNS servers.
Stop internet traffic if VPN connection is dropped – This is the “Internet Kill Switch”. If the VPN connection drops, our app will disable your internet connection. To enable your internet connection back just connect to VPN, disable the Kill Switch or close the CactusVPN app.
Smart DNS
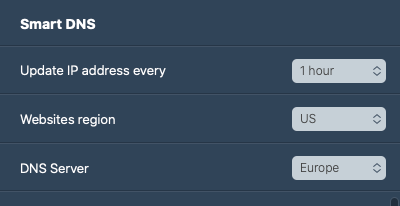
Update IP address every – set up how often your IP will be automatically updated. That’s useful when you ISP often changes your IP address.
Websites region – choose the region that will be used for multi-regional websites.
DNS Server – choose the one that is closest to you.
General
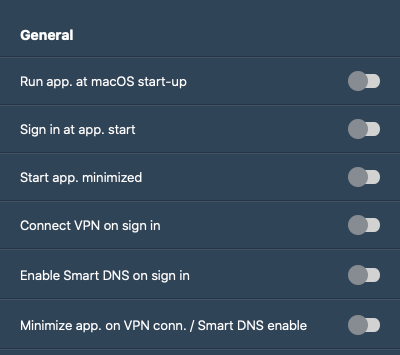
Run app. at Windows start-up – run the CactusVPN app when your macOS starts.
Sign in at app. start – sign in into your account when CactusVPN app starts.
Start app. minimized – start the CactusVPN app minimized.
Connect VPN on sign in – automatically connect to VPN using the last used city and protocol after signing in.
Enable Smart DNS on sign in – automatically enable Smart DNS after signing in.
Minimize app. on VPN conn. / Smart DNS enable – minimize to tray the CactusVPN app after connecting to VPN or enabling Smart DNS.
Apps. Killer
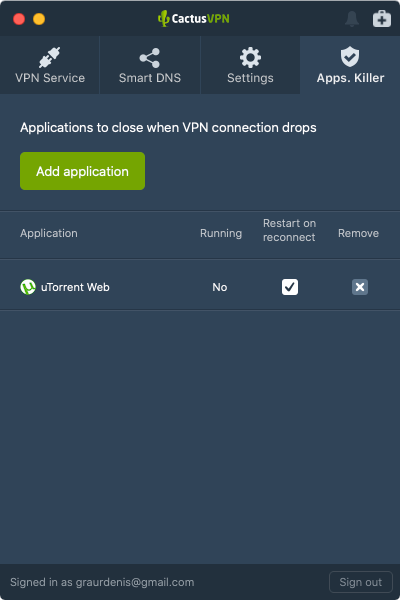
By going to the Apps. Killer tab you can set up which applications will be automatically closed when the VPN connection drops. We recommend adding the P2P/BitTorrent app you use.
- Click the Add application button. Go to the folder where the application is installed and choose the application you want to add.
- Tick the checkboxes from the column Restart on reconnect to automatically restart the application after VPN reconnects.
- Click the buttons from the column Remove to remove the applications you don’t want any more to be automatically closed when VPN connection drops.
Support

Sometimes, for support purposes we need some information from the log files of the app. To save logs, click the Support icon and click the Save logs button. It will save the logs and will open a folder with all CactusVPN log files stored on your computer.
Popular tutorials like this
VPN and Smart DNS Services
Protect online privacy, secure your connection and access blocked websites
Try CactusVPN For Free