Follow the instructions step-by-step to set up PPTP VPN connection on your Android Lollipop device.
-
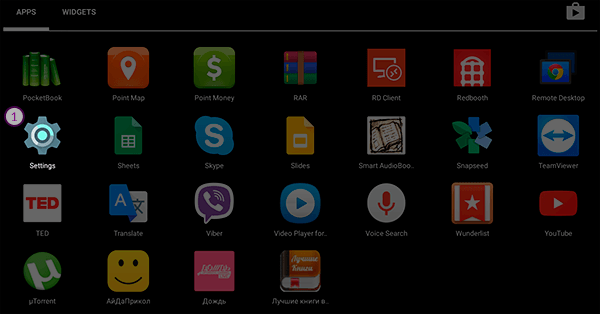
Go to “Settings” (1).

-
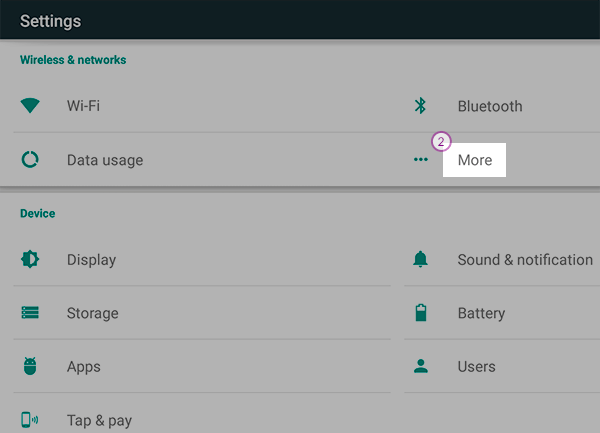
Select “More” under “Wireless & Networks” (2).
-
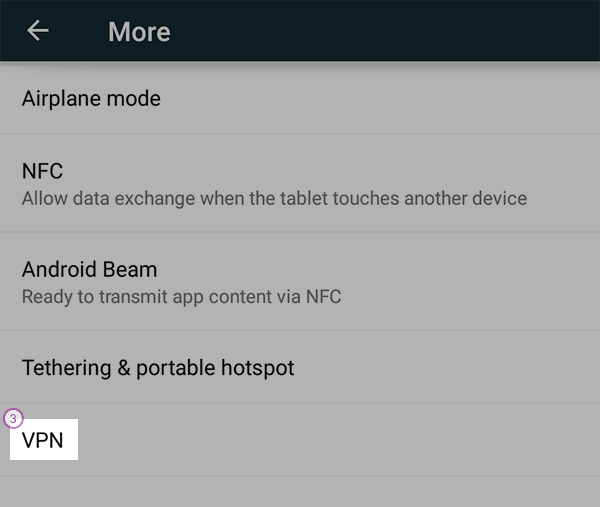
Go to “VPN” (3).

-
Click on “+” sign to add a VPN profile (4).

-
In the “Name” field (5) enter desired name for your connection. We recommend to name it: CactusVPN (PPTP).
Make sure “PPTP” is selected for the “Type” drop-down menu (6).
In the “Server address” field (7) enter the IP address of the CactusVPN server you want to connect to. (To find there the available servers, check the email you have received when you have paid for the CactusVPN account or sign in to Client Area on our website.)
Press the “Save” button (8).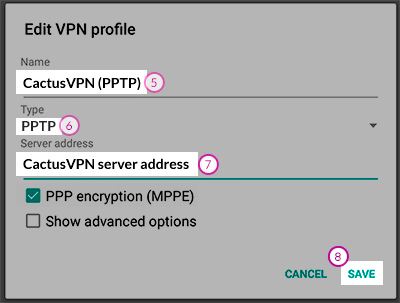
If you want to connect you must follow these steps:
- Go to “Settings” -> “More settings” -> “VPN”.
- Press the VPN connection you just created.
-
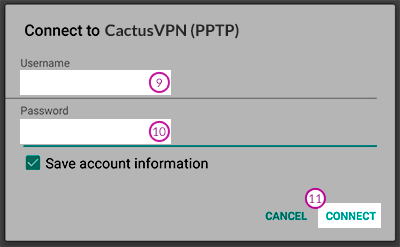
Enter your VPN username (9) and VPN password (10) (to find them, check the email you have received when you have paid for the CactusVPN account or sign in to Client Area on our website), then click “Connect” (11).
- Once there is a small key-like icon on the left side of your notification bar, your phone is connected to the VPN.
-
To end the VPN session click on the active VPN profile and click “Disconnect” (12).

Follow the instructions spet-by-step to set up L2TP VPN connection on your Android Lollipop device.
-
Go to “Settings” (1).
-
Select “More” under “Wireless & Networks” (2).

-
Go to “VPN” (3).
-
Click on “+” sign to add a VPN profile (4).
 /li>
/li> -
In the “Name” field (5) enter desired name for your connection. We recommend to name it: CactusVPN (L2TP).
Make sure “L2TP/IPSec PSK” is selected for the “Type” drop-down menu (6).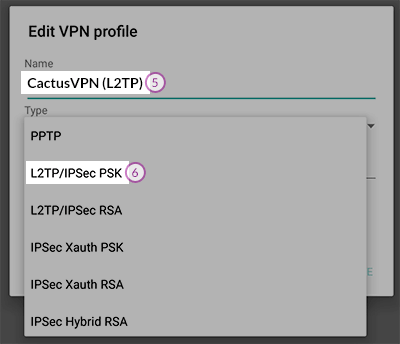
-
In the “Server address” field (7) enter the IP address of the CactusVPN server you want to connect to. (To find there the available servers, check the email you have received when you have paid for the CactusVPN account or sign in to Client Area on our website.)
Enter “cactusvpn” (without quotes) in the “IPSec pre-shared key” field (8).
Leave empty all other fields.
Press the “Save” button (9).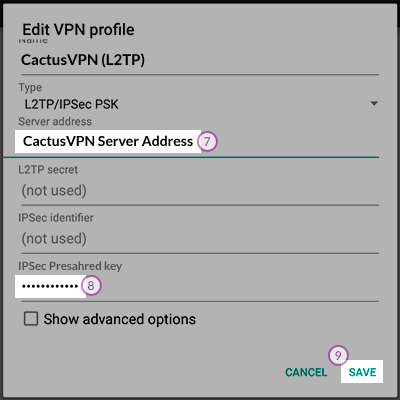
If you want to connect you must follow these steps:
- Go to “Settings” -> “More settings” -> “VPN”.
- Press the VPN connection you just created.
-
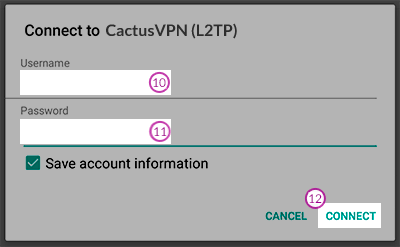
Enter your VPN username (10) and VPN password (11) (to find them, check the email you have received when you have paid for the CactusVPN account or sign in to Client Area on our website), then click “Connect” (12).
- Once there is a small key-like icon on the left side of your notification bar, your phone is connected to the VPN.
-
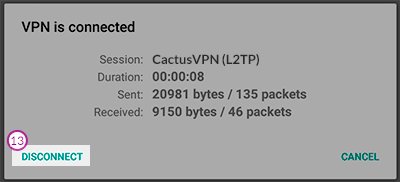
To end the VPN session click on the active VPN profile and click “Disconnect” (12).
-
Download OpenVPN Configuration Files for Android accordingly to your package. Unzip the archive file and save the folder on your Android device’s SD card so you could find it later.
-
Install the app “OpenVPN Connect” on your Android device.

-
Open the “OpenVPN Connect” app.
-
Click the “Options” button (1). Click on “Import” (2) and select “Import Profile from SD card”.

-
Find the folder where the OpenVPN configuration files are. Open it and select the desired server’s config file. Click on “Select” button (3).

-
Enter your username (4) and password (5). Check the “Save” checkbox (6). Click “Connect” button (7).

-
In the next screen check the “I trust this application” checkbox and click “OK”.
-
You are now connected. To disconnect go to “OpenVPN Connect” app and click on “Disconnect” button (8).
