How to Set up SoftEther VPN Client on Linux
In this tutorial we will show you how to set up SoftEther VPN Client on Linux but first let’s see what are our requirements and recommendations.
Requirements
In order to set up the SoftEther you will need:
- A CactusVPN account. If you don’t have one you can try our services for free.
- Your VPN username, password and VPN server address. You can find them in your account on our website, by going to Settings.
Recommendations
- This tutorial requires advanced Linux knowledge. There is a potential risk to break your Internet connection if you don’t follow all steps exactly. You can always set up VPN on Linux using other VPN protocols that are easier to set up.
- Connect to SoftEther VPN protocol on Linux only if you have experience with the configuration of Linux applications and are familiar with reading / modifying IP routing tables.
If you still want to set up SoftEther VPN on Linux, go step-by-step through following instructions:
Part I. Install SoftEther VPN client
We’ll show you how to install the SoftEther VPN client on Linux.
You can do this in two ways: from package manager on Ubuntu or other Debian Derivates [x86_64 or AMD 64 machines] and from source on Linux distributives.
Choose the way you want to use from the menu below and follow its steps.
-
Ensure your system is up to date:
apt update && apt -y full-upgrade
This step is not mandatory, though it is recommended.
-
Add the CactusVPN repository to your package manager source list:
sudo echo "deb [trusted=yes] https://repository.cactusvpn.com/softether/ amd64/" > /etc/apt/sources.list.d/cactusvpn.list
-
Update the package manager cache:
sudo apt update
Important! You may get the following error:
E: The method driver /usr/lib/apt/methods/https could not be found.
N: Is the package apt-transport-https installed?
E: Failed to fetch https://repository.cactusvpn.com/softether/amd64/InRelease
E: Some index files failed to download. They have been ignored, or old ones used instead.If you get this error, you need to install apt-transport-https on your device:
sudo apt install -y apt-transport-https
and run the first command again.
If you do not see any errors just ignore this step.
-
Install the SoftEther VPN manager:
sudo apt install -y softethervpn-stable
-
Ensure your system is up to date:
On Debian / Ubuntu:
apt update && apt -y full-upgrade
On CentOS / Fedora:
yum -y update
This step is not mandatory, though it is recommended.
-
Download the latest version of SoftEther VPN client (at the time of writing this tutorial it was v4.27-9668-beta.) available here:
wget http://www.softether-download.com/files/softether/v4.27-9668-beta-2018.05.29- tree/Linux/SoftEther_VPN_Client/64bit_-_Intel_x64_or_AMD64/softether-vpnclient-v4.27-9668- beta-2018.05.29-linux-x64-64bit.tar.gz
-
Decompress SofEther VPN client:
tar xzfv softether-vpnclient-v4.27-9668-beta-2018.05.29-linux-x64-64bit.tar.gz
-
Make sure your system have all the needed tools for SoftEther compilation.
On Debian / Ubuntu:
apt -y install build-essential
On CentOS / Fedora:
yum groupinstall "Development Tools"
-
Change the directory to the vpnclient folder:
cd vpnclient
-
Compile SoftEther into an executable file:
make
-
SoftEther will ask you to read and agree its License Agreement. Select 1 to read the agreement, again to confirm you have read it and finally to agree to the License Agreement.
SoftEther is now compiled and it’s an executable file (vpnclient and vpncmd). If the process fails, check if you have all of the requirement packages installed.
-
Now we can move the vpnclient directory somewhere else. We moved it to /usr/:
cd .. && mv vpnclient /usr/ && cd /usr/vpnclient/
Part II. Configure SoftEther VPN client
-
Start the SoftEther VPN client:
sudo /usr/vpnclient/vpnclient start
If you see this message: The SoftEther VPN Client service has been started. then the SoftEther VPN client has successfully started.
-
Check the SoftEther VPN client:
vpncmd
-
Select 3 to enter Use of VPN Tools (certificate creation and Network Traffic Speed Test Tool).
-
Test the SoftEther VPN Client installation:
Check
If all the checks are passed, you can go to the next step.
Important! Do not go to the next step until you do not correct all the errors.
-
Press Ctrl + c or Ctrl + d to exit.
-
Set up SoftEther VPN client. Start configuration with:
vpncmd
-
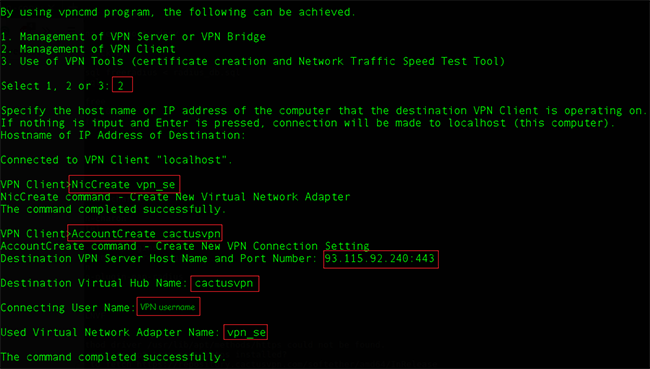
Select 2. Management of VPN Client.
-
Do not enter any addresses at Hostname of IP Address of Destination and press Enter to connect to the localhost.
-
Create a virtual interface to connect to the VPN server. In the SoftEther VPN configuration type:
NicCreate vpn_se
-
Create an account that will use this interface for the VPN connection. Run this command in the terminal:
AccountCreate cactusvpn
-
Set up VPN account with your details:
Destination Virtual Hub Name: cactusvpn
Destination VPN server Host Name and Port Number: {VPN IP address}:{SoftEther VPN Port}
You can find IP addresses of all our servers in your account on our website, by going to Settings.
Connecting User Name: {your VPN username}
You can find your VPN username and password in your account on our website, by going to Settings -> VPN Username & Password. Make sure you use your VPN username and password and NOT the website account credentials (What is the difference?).
Used Virtual Network Adapter Name: vpn_se
If you get the The command completed successfully. message, it means that the account creation was successfully finished.
-
Set up a password:
AccountPassword cactusvpn
and enter your VPN password for Password and Confirm input.
You can find your VPN username and password in your account on our website, by going to Settings -> VPN Username & Password. Make sure you use your VPN username and password and NOT the website account credentials (What is the difference?).
-
At Specify standard or radius: type
radius
-
Connect to the SoftEther VPN client using the created account:
AccountConnect cactusvpn
-
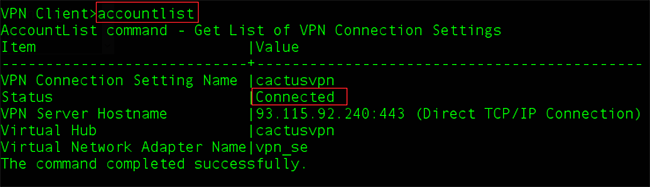
Test the connection to the VPN server:
AccountList
If you see “Connected” you can go to the next step.
-
Press Ctrl + c or Ctrl + d to exit the SoftEther VPN Client manager.
In this tutorial we will show you how to set up SoftEther VPN Client on Linux but first let’s see what are our requirements and recommendations.
Requirements
In order to set up the SoftEther you will need:
- A CactusVPN account. If you don’t have one you can try our services for free.
- Your VPN username, password and VPN server address. You can find them in your account on our website, by going to Settings.
Recommendations
- This tutorial requires advanced Linux knowledge. There is a potential risk to break your Internet connection if you don’t follow all steps exactly. You can always set up VPN on Linux using other VPN protocols that are easier to set up.
- Connect to SoftEther VPN protocol on Linux only if you have experience with the configuration of Linux applications and are familiar with reading / modifying IP routing tables.
If you still want to set up SoftEther VPN on Linux, go step-by-step through following instructions:
Part I. Install SoftEther VPN client
We’ll show you how to install the SoftEther VPN client on Linux.
You can do this in two ways: from package manager on Ubuntu or other Debian Derivates [x86_64 or AMD 64 machines] and from source on Linux distributives.
Choose the way you want to use from the menu below and follow its steps.
-
Ensure your system is up to date:
apt update && apt -y full-upgrade
This step is not mandatory, though it is recommended.
-
Add the CactusVPN repository to your package manager source list:
sudo echo "deb [trusted=yes] https://repository.cactusvpn.com/softether/ amd64/" > /etc/apt/sources.list.d/cactusvpn.list
-
Update the package manager cache:
sudo apt update
Important! You may get the following error:
E: The method driver /usr/lib/apt/methods/https could not be found.
N: Is the package apt-transport-https installed?
E: Failed to fetch https://repository.cactusvpn.com/softether/amd64/InRelease
E: Some index files failed to download. They have been ignored, or old ones used instead.If you get this error, you need to install apt-transport-https on your device:
sudo apt install -y apt-transport-https
and run the first command again.
If you do not see any errors just ignore this step.
-
Install the SoftEther VPN manager:
sudo apt install -y softethervpn-stable
-
Ensure your system is up to date:
On Debian / Ubuntu:
apt update && apt -y full-upgrade
On CentOS / Fedora:
yum -y update
This step is not mandatory, though it is recommended.
-
Download the latest version of SoftEther VPN client (at the time of writing this tutorial it was v4.27-9668-beta.) available here:
wget http://www.softether-download.com/files/softether/v4.27-9668-beta-2018.05.29- tree/Linux/SoftEther_VPN_Client/64bit_-_Intel_x64_or_AMD64/softether-vpnclient-v4.27-9668- beta-2018.05.29-linux-x64-64bit.tar.gz
-
Decompress SofEther VPN client:
tar xzfv softether-vpnclient-v4.27-9668-beta-2018.05.29-linux-x64-64bit.tar.gz
-
Make sure your system have all the needed tools for SoftEther compilation.
On Debian / Ubuntu:
apt -y install build-essential
On CentOS / Fedora:
yum groupinstall "Development Tools"
-
Change the directory to the vpnclient folder:
cd vpnclient
-
Compile SoftEther into an executable file:
make
-
SoftEther will ask you to read and agree its License Agreement. Select 1 to read the agreement, again to confirm you have read it and finally to agree to the License Agreement.
SoftEther is now compiled and it’s an executable file (vpnclient and vpncmd). If the process fails, check if you have all of the requirement packages installed.
-
Now we can move the vpnclient directory somewhere else. We moved it to /usr/:
cd .. && mv vpnclient /usr/ && cd /usr/vpnclient/
Part II. Configure SoftEther VPN client
-
Start the SoftEther VPN client:
sudo /usr/vpnclient/vpnclient start
If you see this message: The SoftEther VPN Client service has been started. then the SoftEther VPN client has successfully started.
-
Check the SoftEther VPN client:
vpncmd
-
Select 3 to enter Use of VPN Tools (certificate creation and Network Traffic Speed Test Tool).
-
Test the SoftEther VPN Client installation:
Check
If all the checks are passed, you can go to the next step.
Important! Do not go to the next step until you do not correct all the errors.
-
Press Ctrl + c or Ctrl + d to exit.
-
Set up SoftEther VPN client. Start configuration with:
vpncmd
-
Select 2. Management of VPN Client.
-
Do not enter any addresses at Hostname of IP Address of Destination and press Enter to connect to the localhost.
-
Create a virtual interface to connect to the VPN server. In the SoftEther VPN configuration type:
NicCreate vpn_se
-
Create an account that will use this interface for the VPN connection. Run this command in the terminal:
AccountCreate cactusvpn
-
Set up VPN account with your details:
Destination Virtual Hub Name: cactusvpn
Destination VPN server Host Name and Port Number: {VPN IP address}:{SoftEther VPN Port}
You can find IP addresses of all our servers in your account on our website, by going to Settings.
Connecting User Name: {your VPN username}
You can find your VPN username and password in your account on our website, by going to Settings -> VPN Username & Password. Make sure you use your VPN username and password and NOT the website account credentials (What is the difference?).
Used Virtual Network Adapter Name: vpn_se
If you get the The command completed successfully. message, it means that the account creation was successfully finished.
-
Set up a password:
AccountPassword cactusvpn
and enter your VPN password for Password and Confirm input.
You can find your VPN username and password in your account on our website, by going to Settings -> VPN Username & Password. Make sure you use your VPN username and password and NOT the website account credentials (What is the difference?).
-
At Specify standard or radius:” type
radius
-
Connect to the SoftEther VPN client using the created account:
AccountConnect cactusvpn
-
Test the connection to the VPN server:
AccountList
If you see Connected” you can go to the next step.
-
Press Ctrl + c or Ctrl + d to exit the SoftEther VPN Client manager.
Part III. IP and routing table
-
Check if the IP forward is enabled on your system:
cat /proc/sys/net/ipv4/ip_forward
If you get 1 you can skip this step and go to the Obtain an IP address from the VPN server step.
If you have 0, please enable IP forward:
echo 1 > /proc/sys/net/ipv4/ip_forward
You can also make it permanent by editing the /etc/sysctl.conf file:
echo net.ipv4.ip_forward=1 >> /etc/sysctl.conf && sysctl -p
If you get net.ipv4.ip_forward = 1 the IP forward was successfully enabled.
-
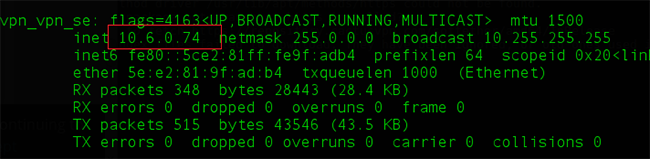
Obtain an IP address from the VPN server:
sudo ifconfig
and you’ll see the virtual network vpn_vpn_se created with SoftEther VPN client tool.
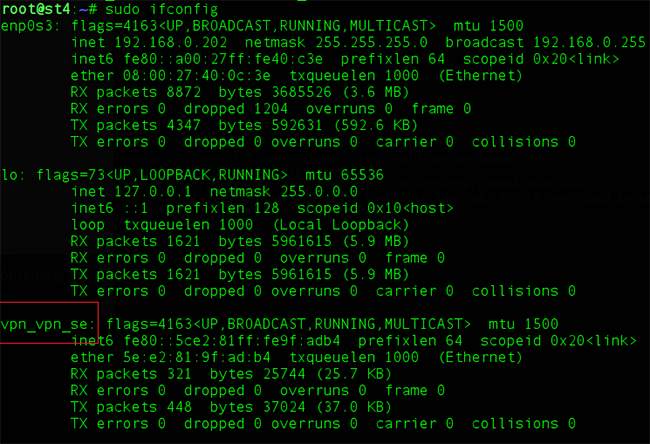
To get an IP address from the VPN server:
sudo dhclient vpn_vpn_se
After a few moments you should get an IP address from the 10.6.0.0/24 network.
-
Edit the routing table:
sudo netstat -rn
to see the current routing table. Yours should be similar to this:

-
Add a route to the VPN server’s IP address via your old default route. In my specific case:
sudo ip route add 93.115.92.240/32 via 192.168.0.1
The 93.115.92.240 is the IP address of the VPN server. The 192.168.0.1 is my previous gateway.
-
Delete the old default route:
sudo ip route del default via 192.168.0.1
After these updates, the routing table should look like this:

-
Ping any IP address to check your network connection:
ping 8.8.8.8 -c4
-
Check your public IP address from the command line:
wget -qO- http://ipecho.net/plain ; echo
If you see the VPN server’s IP, everything was set up correctly and your Linux is connected to the VPN via SoftEther VPN client.
If the ping to the 8.8.8.8 is OK but you can not retrieve anything else by public hostname, add Google DNS (or any Public DNS server) to your /etc/resolv.conf file:
sudo echo nameserver 8.8.8.8 >> /etc/resolv.conf
Part IV. Disconnect from VPN
To turn the VPN connection OFF you need to close SoftEther VPN Client manager and edit the routing table to get the access to the Internet via your router’s gateway.
-
To disconnect from VPN simply turn OFF the SoftEther VPN Client manager:
sudo /usr/vpnclient/vpnclient stop
-
Edit the routing table by deleting the route from your gateway to the VPN server (in our specific case 93.115.92.240/32):
sudo ip route del 93.115.92.240/32
-
Add a default route via your local gateway (192.168.0.1 for the IPs we used in this example):
sudo ip route add default via 192.168.0.1
VPN and Smart DNS Services
Protect online privacy, secure your connection and access blocked websites
Try CactusVPN For Free